Monday, July 6, 2015

Small Balcony Changes on a Budget

I did a bit of redecorating on my small condo balcony this summer - the pillows I'd used for the last two summers were pretty shot and I needed a comfy chair and some shade out there.


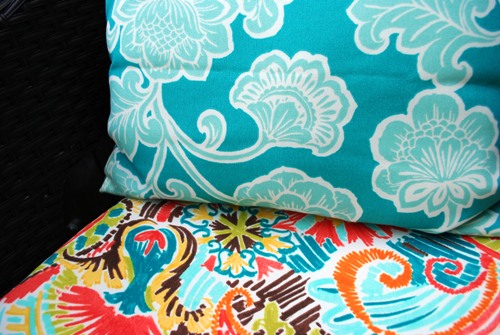
I had this pretty aqua fabric I'd picked up in the remnant bin at Joann's that I used to make my pillows. I didn't bother with zippers or anything fancy this time as I just wanted to get them done.

I also purchased a new chair to replace the sling chair, which was getting pretty rickety. I've always loved chaise lounges, but the space is small and I didn't want to give up that much room. This chair and ottoman set for $99 (check your store, I don't know why the price is double online) from Home Depot seemed to fit the bill - the ottoman slides partly under the chair (or all the way under if you turn it around backwards) to save space when it is not in use.

The dark faux wicker is easy care and I thought a nice compliment to the oil rubbed bronze backs and legs on the other chairs. The chair pad ($16ish, sold individually in the store) wasn't intended for this style chair - I thought it fit better when I picked it out, but it isn't too bad - I'll probably just make my own next time. I loved the bright, pretty colors and the aqua tied in nicely with the other pillows. The patterns work together because they share a color and one is busy and crazy while the other is simpler, and calmer. I'm still looking for a new rug in either a small geometric or a stripe - probably in the aqua.


The umbrella is a cute 5' one from World Market. I ordered the frame and cover last year at the end of the season on deep discount. They shipped the frame and then informed me the cover was out of stock - the frame was so cheap ($12ish I think) I went ahead and kept it, thinking maybe I could make my own cover for it or something but when I checked this year they were still carrying them so for $28ish (with shipping) I just ordered again. The base I picked up for $18 at a local Produce Junction. It has plastic parts and doesn't hold together as tight as I'd like, but I guess that is the difference from the ones that cost $50+

You may remember my two tables from years past were navy blue. I spray painted the bamboo-looking one, along with the coral wall pocket, a more traditional gold - the other I was going to spray paint in oil rubbed bronze, but I picked up a cute double-decker plant stand for just $3 at Goodwill to use instead. I love the multiple layers, and while it could use a coat of new paint as well, let's face it, by the time I get to it I'll probably be onto another color scheme, but the color at least works for now. The old table folds so it was easy to store if I want to pull it out again later.


The old globe lights were burned out (I seem to get about 2 years out of them, using them year-round on a timer about 4 hours per night) so I went with rope lights this year. I've found Big Lots to be the best place to get them - they always have long strings (the globe lights were 25', with 40 globes and the rope lights are around 18'), and are inexpensive. They're up to $12 this year, I think I've paid $10 in the past. They're a nice warm light.

My tropical plant (I don't know what it is) is still going strong and I tried growing a zucchini in a pot this year - it is doing well, but I should have given the tomato its own pot. 

Overall we love this small little space - it's great for lounging (all of us), reading, eating, drinking (me), and snoozing (kitties). 


Thursday, November 20, 2014

Halloween Hat

OK, so it's a little after Halloween, but I realized I never got this posted and I'm still pinning Halloween ideas for next year, so what the heck. Here is the witch hat I created using an old crunched up velvet hat, some tulle ribbon, and a seasonal floral bunch from the craft store. I think all told it was  about $8 worth of materials and 10 minutes with a glue gun. I cut the flowers apart so I could arrange them the way I wanted and just glued them in place.


I did actually wear it, but it was cute as a display on the candlestick lamp too (just don't turn on the lamp while the hat is up there.) Someone also suggested using it as a centerpiece - I'd maybe put it on a pumpkin if I were going to do this.

Wednesday, October 15, 2014

Halloween Door Decor: Take 2

When it comes to seasonal and holiday decorating, I don't feel the need to reinvent the wheel every year just for the sake of doing something "different." Sometimes inspiration strikes, and sometimes I loved what I did last year and will recreate it or tweak it just a bit. So with that in mind, this year I just built on last year's front door arrangement.


I couldn't find the gold ribbon I'd used before, so I left it out. My pumpkin had a cute curled stem that I didn't want to cover, so I stuck some branches in the back and propped my crow on those, and I added a second pumpkin - a vertical one to offset the round fat one in the bucket - to the side. Initially I'd planned to hang some vintage Halloween photos from the branches, but decided that would be too busy, so I'll maybe find another way to use those. Even without the gold ribbon, I think this turned out just perfect and I think I like it better than last year's version thanks to the height and interest added by the branches.

Pssst. I'm linking up to the following Halloween blog parties. Stop on over and see all the great ideas for a spooktacular Halloween.


Thursday, October 9, 2014

Haunted Halloween Dollhouse

Even though the official, unofficial Pinterest Challenges have ended, I was smitten with this little haunted dollhouse and wanted to try something similar on my own. I used an existing set of cubbie shelves that hang in my bathroom and normally house pieces of jadeite, ironstone and milkglass, but I knew the nine little compartments would work perfectly for what I had in mind.


I spent about $8 at the craft store for some scrapbook paper and a few Halloween themed scrapbooking stickers and mixed them up with doll house furniture I already had (some from my childhood, some my grandmothers) and a few other little Halloween items and I'm thrilled with the results. Starting from the top, the mini pumpkin is real, the orange mum is a clip on pin from the dollar store.


The first cubbie has a crow from the scrapbooking sticker set, a mini fake pumpkin from the craft store and a chair and spinning wheel from my collection.


The one below it has I made a little banner from the leftover background paper. I think the kitty needs a witch hat or something to add just a touch more Halloween to the scene. While some of my wallpaper was out and out Halloween themed, other pieces were just orange or black in classic patterns so things didn't get too crazy and busy.


The bottom has another mini pumpkin from the craft store, the crows are scrapbooking stickers I perched on a slightly opened drawer of a dresser from 1952! Next door is a pumpkin shirt I made years ago from a pattern for a doll - I stuffed a tissue up in it to make it stand. The hat I think came in a floral arrangement and the broom I whipped up with a broken off wooden skewer and a brown paper lunch bag (cut a strip, cut slits in it and wrap around the handle and tape). 


Back up in the attic I have the last scrapbook sticker and another older wash stand.


The bedroom has a mini brass bed, clock, chamber pot, another craft store pumpkin and a teeny, tiny metal mouse. This could use a little more Halloweening in the form of a coverlet for the bed or maybe a skeleton to lay in it.


The last few cubbies I just filled with pumpkins real and fake and the center square has an awesome haunted house sticker.


I'll be back (hopefully) with a few more Halloween decorating posts - I realized this week I prefer decorating for Halloween over other holidays because dusting is optional!

Pssst: I'm linking up to the following Halloween blog parties. Hop on over to check out all the great ideas.


Related Posts Plugin for WordPress, Blogger...