Showing posts with label balcony. Show all posts

Monday, July 6, 2015

Small Balcony Changes on a Budget

I did a bit of redecorating on my small condo balcony this summer - the pillows I'd used for the last two summers were pretty shot and I needed a comfy chair and some shade out there.


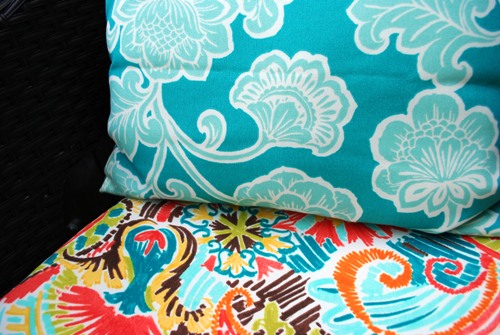
I had this pretty aqua fabric I'd picked up in the remnant bin at Joann's that I used to make my pillows. I didn't bother with zippers or anything fancy this time as I just wanted to get them done.

I also purchased a new chair to replace the sling chair, which was getting pretty rickety. I've always loved chaise lounges, but the space is small and I didn't want to give up that much room. This chair and ottoman set for $99 (check your store, I don't know why the price is double online) from Home Depot seemed to fit the bill - the ottoman slides partly under the chair (or all the way under if you turn it around backwards) to save space when it is not in use.

The dark faux wicker is easy care and I thought a nice compliment to the oil rubbed bronze backs and legs on the other chairs. The chair pad ($16ish, sold individually in the store) wasn't intended for this style chair - I thought it fit better when I picked it out, but it isn't too bad - I'll probably just make my own next time. I loved the bright, pretty colors and the aqua tied in nicely with the other pillows. The patterns work together because they share a color and one is busy and crazy while the other is simpler, and calmer. I'm still looking for a new rug in either a small geometric or a stripe - probably in the aqua.

The umbrella is a cute 5' one from World Market. I ordered the frame and cover last year at the end of the season on deep discount. They shipped the frame and then informed me the cover was out of stock - the frame was so cheap ($12ish I think) I went ahead and kept it, thinking maybe I could make my own cover for it or something but when I checked this year they were still carrying them so for $28ish (with shipping) I just ordered again. The base I picked up for $18 at a local Produce Junction. It has plastic parts and doesn't hold together as tight as I'd like, but I guess that is the difference from the ones that cost $50+

You may remember my two tables from years past were navy blue. I spray painted the bamboo-looking one, along with the coral wall pocket, a more traditional gold - the other I was going to spray paint in oil rubbed bronze, but I picked up a cute double-decker plant stand for just $3 at Goodwill to use instead. I love the multiple layers, and while it could use a coat of new paint as well, let's face it, by the time I get to it I'll probably be onto another color scheme, but the color at least works for now. The old table folds so it was easy to store if I want to pull it out again later.


The old globe lights were burned out (I seem to get about 2 years out of them, using them year-round on a timer about 4 hours per night) so I went with rope lights this year. I've found Big Lots to be the best place to get them - they always have long strings (the globe lights were 25', with 40 globes and the rope lights are around 18'), and are inexpensive. They're up to $12 this year, I think I've paid $10 in the past. They're a nice warm light.

My tropical plant (I don't know what it is) is still going strong and I tried growing a zucchini in a pot this year - it is doing well, but I should have given the tomato its own pot. 

Overall we love this small little space - it's great for lounging (all of us), reading, eating, drinking (me), and snoozing (kitties). 


Sunday, July 7, 2013

Balcony Makeover: Phase I

Well, it's been a long, rainy time in coming, but I'm finally about done with the first phase of my mini balcony makeover. I pretty much used what I had on hand, rehabbed my old sling chair, made some pillows with some remnant fabric and an old shower curtain I had laying around, spray painted a few small tables, and tossed down some rugs. My color palette is navy blue, green, and coral with a little orange by way of the pillow fabric and terra cotta flower pots (and a certain orange boy-kitty).


It is a small space and gets direct sun all day, so I mostly use it early in the morning or later in the day. The cats like to hang out and sniff the air and look down on the dogs going for walks around the block and I sit out there to either read or eat breakfast or dinner or enjoy a beer.

One side has two (totally cheap-o) plastic chairs - they were "temporary" chairs I bought last year until I can find something I really love - I think they were less than $5/each. The color works and they're low maintenance but I'm certainly not trying to present them as anything great. I made two pillows with a remnant of Richloom's Little Ash Birds in navy blue on the front and a blue and white striped backing made from a thrifted canvas shower curtain. I'm pretty impressed with myself that I actually put zippers in the covers too! Between the chairs is a thrifted metal patio table I paid $3 for and spray painted navy blue. The flower pots were all ones I had on hand and are planted with coral petunias and the one on the floor has mint, catnip and cat grass in it for the you-know-whos so they don't try to eat the other plants.


And here is what it looked like before:


The other side of the balcony has my sling chair which I repaired by filling in weathered areas with wood filler and painted white. The old cover was shot so I made a new one with the blue and white striped shower curtain and the stripes running horizontally. When I laid it on to figure out the length I liked the way it looked with the extra fabric hanging down, so I just left it. I only had a small bit of the bird fabric left, so I used it as the center panel and patched in some of the striped on the sides so it was wide enough, and it is backed with the stripes too.


The little side table was also a $10 thrift store find I spray painted blue - it looks like bamboo, but was not one of the nice brass ones - it had some sort of antiqued looking silver finish that I didn't feel too bad painting over. The top is mirrored, but since it is outside and I didn't want to accidentally blind myself, a kitty, or random passing pilots, I put some frosted shelf liner on it. It needs spray adhesive or something on the back because it gets moisture underneath but otherwise it's not a bad solution.


And here is the before on this side:


The etage in the background is one I used to have inside and was over, it fits well in the space and seems to be holding up well in the weather. The wall pocket was another thrift find I painted coral and stuck some white petunias in. For rugs, I used two green rugs I got on clearance at Target last year and just randomly layered them (you can see where I shifted them around a but and the color has faded a bit unevenly, but I think it will even out again in the sun).

I still need to finish wrapping the old plastic crates in twine and work on a canopy of some sort. I'll get there. Eventually.


Friday, April 19, 2013

Balcony Planning and Progress

I've finally started working on my outdoor space, which consists of an approx. 6' x 10' balcony and after a night spent perusing Pinterest, I'm pretty excited about it. Some of the examples I really loved included the following:


I think the color palette in this example is just lovely. I will incorporate the orange/coral into my space, but have already picked out fabric in a navyish blue. I also like the natural wicker texture and color and may look to eventually replace my chairs with something similar to these low, comfy looking examples if I can find them. I'm working on an idea for a canopy and like the closed in feel it creates and the overhead lighting - saw a cool pendant light from Ikea that runs on solar and wind power.


I have globe lighting similar to this, and think lighting is a big amenity in any outdoor space. I love and use timers so they just go off and on on a schedule. I also really like the low, comfy looking seating in this space - maybe sometime in the future. Of course I'll be accessorizing with a cat or two.


This is another space I really love- the neutral color palette seems so serene and calm and I love the texture of the wooden crates, which is an element I'm envisioning for my space. I'll definitely be keeping my eyes open for a pair of chairs like these at a thrift too.

I didn't get any true before shots of my space, so let's take a look at the part-way-there pictures. My mini-makeover started with the utility closet door - it had some rusty spots that needed sanding out and the doorknob was antique brass oversprayed with brown - not pretty. Our regulation color is what I like to call "Poo Brown" - when I opened the can it looked more like purple poo, but did dry more on the brown side. Painting is really no fun when you're forced to use a color you hate, but it is what I'm stuck with so will make the best of it. I had a thrifted wall pocket I wanted to use on it - it too was a brown color, which would have been fine on another color door, but obviously wasn't going to work on the brown one, so I picked up a small bottle of coral colored Patio Paint at the craft store - it is like the typical craft paint but said it was OK to use outdoors, so for a few bucks I thought I'd give it a try - spray paint is sometimes tough to find in the exact shade I want and takes up more space in storage too when I just need a little. The pocket still needs a coir liner or some sheet moss so I can plant it - maybe with white petunias or a trailing sweet potato vine (the more of the door I can cover the better).


I'm pretty much trying to work with what I've got, so this side of the balcony also has my baker's rack which is an indoor piece I'm pretty much over, a sling chair that needs some restoration work, and a new $10 thrift store table in a faux bamboo look, which I will most likely paint a navy-ish blue to go with the blue and white striped fabric I want to use on the sling chair. The baker's rack clearly needs to be styled with plants, maybe a colorful plastic tray or plate, a big jug of water (for the plants), lanterns, etc.

For the sling chair I thrifted a blue and white striped canvas shower curtain and will run the stripes horizontally like this example I pinned which seems to be the less traditional way of doing it, since examples were  hard to come by.


The other side of the balcony will pretty much stay as is, except for spray painting the little $3 thrift store table blue to match the bamboo one. The green plastic chairs are about as cheap as they come, but I like the color and they will do until I find something else. 


I want to figure out a way to cover the plastic record crates with wood to look like old weathered crates, something like the below, rope handles and all (from here) which will then serve as small ottomans or additional seating. 


 I also have a few bright green cotton flat weave rugs that I'll toss out there. A few of the examples I pinned had them just randomly layered, which I like.


Thursday, July 21, 2011

Undercover: How to Turn Milk Crates into a Side Table for the Patio


I have a list about a mile long of unfinished projects: projects I’ve bought some or all of the materials for and haven’t even started; projects I started and need something or another to finish; projects I’m just thinking about and planning. So earlier this month I decided to get to work and get at least one thing done that I had supplies on hand for. Does anyone remember making stacked “milk crate” furniture in college? Yeah, I still have some of those crates around. Don’t worry, it’s not in my living room or anything, but I had two crates in storage that were just the right size for a little table out on my balcony.


Problem is, they looked like two old stacked milk crates. I while back I bought some burlap to make a cover for them. I took some measurements to get an idea of what size pieces I needed to use, added in for seam allowances, and then just kinda rounded off when it came time to putting it all together. I’m visual so I made a little drawing which I forgot to photograph. Trust me, it is no work of art, but I was able to figure out my measurements from it.

I chose to do a somewhat tailored cover with corner pleats. To make the pleat, you basically need 3x the length of fabric as the size of the pleat – so for instance for a 4” pleat, you need 12” of fabric to account for folding the fabric in and back out again. I used a dishtowel and a tape measure to practice the fold and figure out the amount of extra fabric – I’m very scientific that way. No really, this heavy-duty engineering stuff only really makes any sense to me if I can see it. So 12” of fabric for each corner times 4 corners, plus the circumference around the crate, plus seam allowances meant I needed about 106” of fabric for around the table. I think I bought 2 yards of fabric, so I had to seam it together to get to the 106”. For length, I just cut the fabric through the middle long ways and that gave me enough length for seam allowances plus some overhang for a more slouchy look. I used the selvages for the hem so I didn’t have to sew one. I sewed the 106” into a circle, cut out a roughly 13 ½” square piece for the top and then pin fit the skirt to the top. I started by pinning one of the seams of the skirt to the center of one of the edges of the top. Then I pinned the opposite side of the skirt to the center of the opposite side of the top. I mostly just eyeballed and pulled the skirt out to find the centers – I guess you could measure if that is your thing. Then I did the other two opposite sides the same way.


Once I had the center point of each side of the top pinned to the center point of each side of the skirt I just continued pinning down each side until I got to the corner.


When I was finished, I had a “bubble” of extra fabric at each corner which I just folded over in each direction to make the pleat – remember I was working inside out at this point, although burlap doesn’t have a right or a wrong side – and pinned into place.


Then I went to the sewing machine and started sewing along my pin lines.

Two lessons learned: pin perpendicular to the edge of the fabric, not parallel, and use pins with large heads. I actually knew the first from regular sewing from a pattern, but this was the first time I’d pin-fit anything and it seemed easier to almost create the seam line with the pins – it is hard to get the pins out as you sew up to them when you pin like this. The second point is specific to the burlap – the small headed pins kept slipping down into the large weave of the burlap and were hard to get out or they went all the way through and didn’t do their job.

Burlap also doesn’t iron well and it is hard to tell where you did and where you didn’t iron. Do I anyway, it does make a subtle difference in getting the seams to lay better. Where my seams look a little wonky is actually just bad ironing and the rain has smoothed it out a bit now too.


So overall, I think this is a vast improvement over two tacky stacked milk crates. Ignore on my tacky plastic chairs – they were cheap, the color I wanted, made in the US, and are 100% recyclable. I have no idea how this will hold up to the elements - we've had some rain and a ton of hottness here lately and all seems A-OK. I think if I were to do it again I’d chose a lighter weight fabric, but overall I like the effect and I’m pretty amazed my corners came out in the right spot and don’t look too bad. I had considered doing a navy piping at the juncture of the top and skirt, but considering the bulk of the fabric, am glad I opted not to this time around. All told I spent maybe $6 on the burlap. And on to the next project.


Sunday, February 27, 2011

Summer Dreamin'

This year I'm hoping to do something with my balcony to make it a little more useable when the hot weather rolls around - it is in direct sun with no awning or roof. I'm not crazy about the idea of a market umbrella - I love them in theory, I just don't think it is the right solution for my space. We're not allowed to attach anything to the building exterior so any type of retractable awning is out. I've had a framework in my head that I think I can build and attach a homemade awning to, so I'm hoping to do something custom, which I think will be pretty easy and relatively inexpensive. More on that later, but this evening I spent some time perusing fabrics and paint colors hoping to come up with a color palette.

The siding is James Hardie Boothbay Blue, similar to the solid blue swatch and the trim and balcony are similar to the solid tan swatch.


I am really loving the idea of adding some marine blue and kelly green to the rather dull colonial colors I have to work with and have found two fabrics I love that incorporate the blue. The one on the left is Sunbrella's Matouk Regatta ($20/yard) and the one on the right is Solarium's Imogen Pacific ($10.95/yard). Ideally I'd like to find a stripe that mixes the blue and the green but haven't come up with anything yet.

A few other fabrics I considered were P. Kaufmann's OD Slick in Navy and Palm, which I still might add for accent pillows:


and Waverly's New Twist Aquamarine, which I think is a little too modern for me, but pretty nonetheless:


I also briefly considered yellow or purple for accent colors in place of the green, but after viewing fabric swatches I think green is the way to go for me. I also may throw in a bit of an orangey-coral for fun - we'll see.

I'm linking up to Centsational Girl's Home May'd Outdoor Link Party. Hop on over and check out all of the great outdoor ideas.

Thursday, June 24, 2010

How to Repurpose Old Patio Chairs into Cute Planters

I pretty much never throw away anything. Heck, I even trash pick for other people’s castoffs. Of course the one time I do throw something out, it comes back to bite me. Cases in point are these vintage ice cream parlor chairs. These were actually a trash treasure rescued many years ago and enjoyed for their intended purpose for several seasons. The seats were a wooden base topped with a foam cushion covered in a lovely (not) orange pleather-like material. Eventually from being outside in the rain and weather the fabric split and the foam got all gross. What I should have done was remove the foam and faux fabric and keep the wood as a base for making new cushions. What I did do was toss the whole mess. So great, now I have these two chairs and no easy way to cut a circular wooden base, let alone the desire to tackle a circular cushion (I’m a fair sewer, straight lines are good, curves, OK. Perfect circles? With piped edges? Not so much). So, what to do with these chairs? I decided to make them into planters: a very easy, quick, and unique solution. I originally looked at just regular clay pots, but didn’t really want anything that deep, so instead I got wire coir lined baskets, popped them in and planted them up.

Vintage Iron Chair Converted to Planter


I think next season I may paint everything a uniform color, but I’m waiting for the new siding to go up before I really decide what I’m doing color and style wise out on the balcony, so for this season, I think they turned out pretty cute. Anyone else have cute ideas for planters or repurposing chairs?
Related Posts Plugin for WordPress, Blogger...